
09/12/12
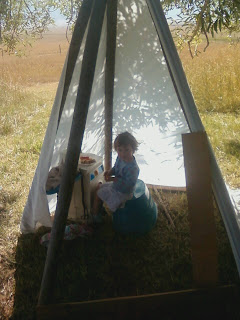
JJ's Teepee
09/10/12
JJ's First Treehouse & slide
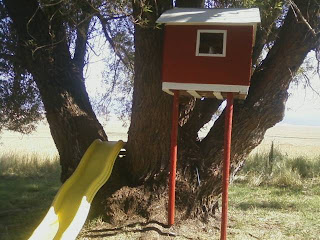
There are no "real" instruction for this...and I only painted :)
DIY Coat Rack
JJ's Teepee

I've gotta' give credit where it's due. John D. (hubby) made this adorable little teepee for Johnna B. We just have to find another white sheet for the front. This is actually a very easy project, as you can see.
09/10/12
JJ's First Treehouse & slide

There are no "real" instruction for this...and I only painted :)
DIY Coat Rack
Here's a fun and pretty project that I'll begin once we're moved and a bit settled. This coat rack has been on my mind and at the top of my craft list. I hope you like!
*I didn't think instructions for this would be needed*

This diy coat rack is going in my new mud room! There are so many unique and beautiful knobs to choose from, I also love the vintage look for this project.
________________________________________________________________________________
Wow...last time I had my sewing machine out the baby was just born in otherwords, not MOBILE...this might take awhile!
1) reupholster foot stool
2) make roman shades for kitchen
3) add recipe's to this page
4)make full size & skirt aprons
4)
*Instruction & pics to follow*
______________________________________________________
______________________________________________________
Introducing...
The 20 minute apron!
(or the nap~time apron:)
I was sitting here at the table setting everything up to do some sewing and realized (after about 30) minutes of up, down, stopping, starting and on and on and so on and so forth ;) that with a baby I might wanna' figure out a super quick project...and I did! I hope you enjoy and make this cutie pie, I just love it.
*supplies: skirt fabric (20x22inches), waste band fabric (22x4 inches), heart fabric (8x8)
4 feet & 2-1/2 inches of wide ribbon
*supplies: skirt fabric (20x22inches), waste band fabric (22x4 inches), heart fabric (8x8)
4 feet & 2-1/2 inches of wide ribbon
1.) cut your chosen piece of fabric 22x20

2.) cut waste band 22 inches long & 4 inches wide (set aside)

3.) cut out large heart
4.) set sewing machine to the zig zag stitch and widen the tension to about 4, sew heart to skirt (where you prefer it)

The heart was going to be a pocket but I just kept sewing hee,hee...I realized after that it was prob. for the best as it would have been to flimsy (you can choose-to pocket or not to pocket :)
5.) fold skirt length wise &round edges then frey w/ your finger's

6.) frey the heart w/ your finger's
7.) pin waste band fabric (be sure to use a different color for the right look) on top of skirt
8.) pin & sew your ribbon on top of the waste band fabric (the wb fabric should be wider than the ribbon (using straight stitch) on the top & bottom of ribbon (get as close to the edge of ribbon as possible, so it's not real visible.)

9.) set machine back to zig zag stitch and sew the side and bottom of skirt to help prevent too much freying.

Whalla!! You're done!
It's sew* easy...it might even be easier to just look at the picture and go from there.


my little model showing you just how adorable this apron is on!

I simply adore big chunky bows!
_________________________________________________________________________________


__________________________________________________________________________________
reupholster foot stool/chair seat
cost: .75 cents
(remnant material from 2nd hand store)
easy (all my crafts are easy :)
1) measure seat/stool, add 1 inch & a 1/2 to all 4 sides
2) unscrew seat/stool from legs
3) remove old fabric, you may need to use a philips screw drive and simply tuck it under the staple and pull
4) cover seat/stool with new lovely fabric
5) pull tight and began to staple, you'll see that it's best to use a lot of staples to keep it snug
6) cut off any excess material
7) screw seat/stool to legs
HINT: The corner's were a bit tricky when I was stapling them, afterwards I saw that it makes a difference that each corner is folded in the same direction.
Whalla!
You're done*
It's pretty easy and maybe even self explanatory but possibly it's helped motivate you to check something off of your "to do list" as well. :)

before (obviously)
wow! I don't think I realized how bad it was :)

after
yay!
__________________________________________________________________________________
framed jewelry display's
Cost: around $4
~super easy~
*pick out your frame (garage sales or 2nd hand stores are a great place to find lot's of inexpensive & unique frames)
*remove glass & backing
*brush on about 3 coats of craft paint
(1 coat of polyacrylic finish for glossy or leave matte)
*measure the distance you want the necklaces to be
*screw in cup hooks
*for the earing display, staple spring twine to the back of the frame
congratulations you're done!

I love this look

acknowledgments: cat on a limb
__________________________________________________________________________________
I'm excited to share some of the ideas that pop into that noggin of mine on occasion
These two projects are super easy, free and I think they make a pretty difference to the yard. I like a decorated front entrance, I want my guest to feel welcome. I hope you can use these ideas for your home as well.

I prefer my pots to be full of flower's or at least some kind of life, so I decided to take a walk and I happened upon a bucket full of acorn balls and thought...hmmm...what can I do with these little critters...walking back to my front yard I saw my lonely flower pot just begging for company...ala'...and there you have it. I think it looks pretty and was absolutely free. This project is especially great in the winter months when very few flowers survive the cold weather.

Spanish Moss is so unique and has it's own special story. Walking in the mountains afford you all sorts of goodies. I wanted to somehow incorporate a little character to my front yard and what better way then to decorate a beautiful wooden pot with this pretty moss!
mulch/ground cover
Digger Pinecones make an excellant and attractive ground cover. I was racking my brain one day trying to figure out how to keep the darn cat and his not so sweet smelling presents out of my flower beds. Aha: pinecones! They look beautiful, it's free and it's all natural. I prefer Digger pinecones because they have very sharp features that prevent the cat's from using my flower bed as a litter box!
Very unique and peaceful, love it!
ReplyDeleteI am just amazed at your creativeness, WOW!! I wish I had half of your ingenuity - way to go!
ReplyDelete